
I’ve been working on a new mini-album and wanted to share the very economic album I’m using. I cut down a 6″ x 8″ chipboard binder to fit traveler’s notebook-sized pages! I originally got the idea from Jessica Rubio, who cut down the same binder to 3″ x 8″ for her trip to Mexico. I wanted to do the same thing, but slightly wider, to accommodate TN pages.
While I love working in the traveler’s notebook format, I don’t love the limitation on bulky items and odd-sized pages. I also don’t always scrapbook chronologically which means using a traditional notebook can sometimes be a challenge when my mini-album is ordered chronologically. I like being able to jump around and move things if I need to.
Cutting down the binder is pretty straightforward. When you’re finished, you will have an album that will fit standard size TN pages (4.25″W x 8.25″H), or pages of up to 5″W x 8.25″H (this is the width adjusted when the TN paper is in a page protector).

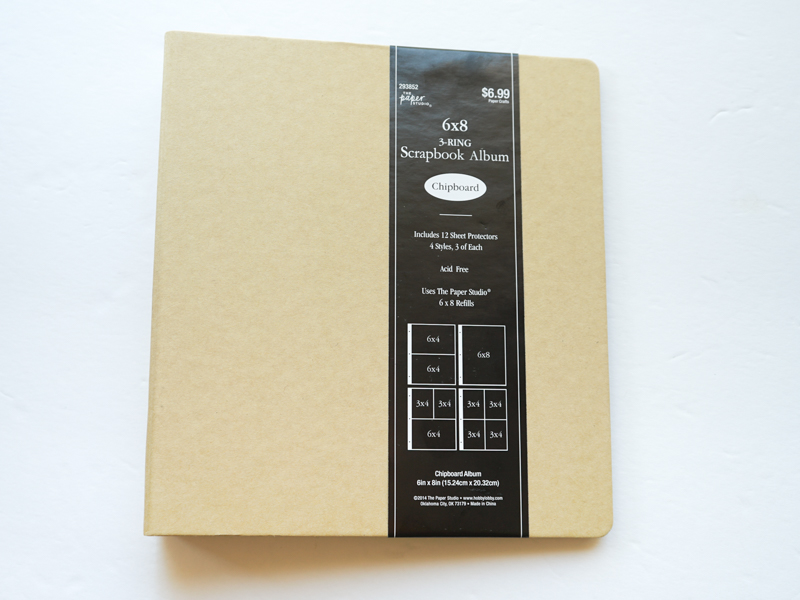
I am using this 6″ x 8″ chipboard binder from Hobby Lobby (but you could probably use another 6″ x 8″ binder). It has a 1.5″ spine, 3-ring configuration, and comes with some page protectors. It retails for $6.99 but the store was having a sale on this entire brand (The Paper Studio) so I got it for $3.50 + tax.
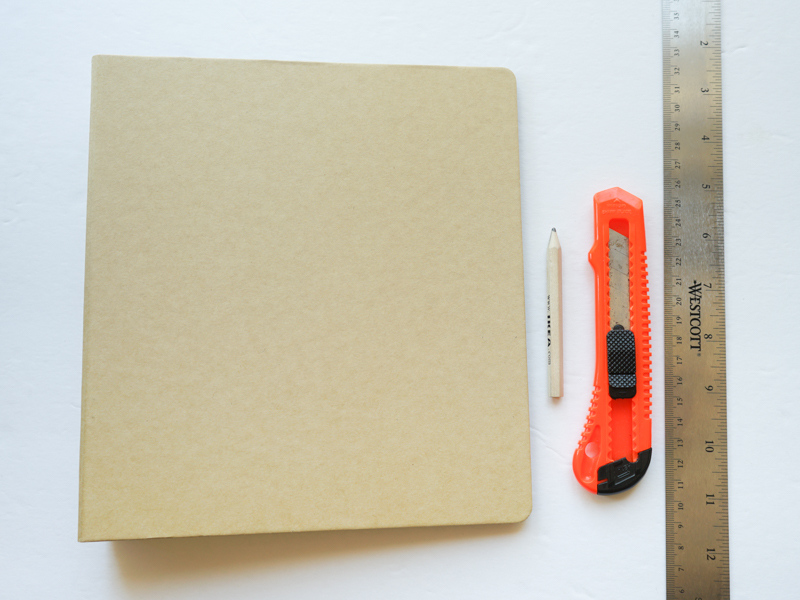
For this project, you will need:
- a binder
- a box cutter, x-acto knife, or something similar to cut with
- a ruler
- a pencil
- Fuse tool, for page protectors (optional)
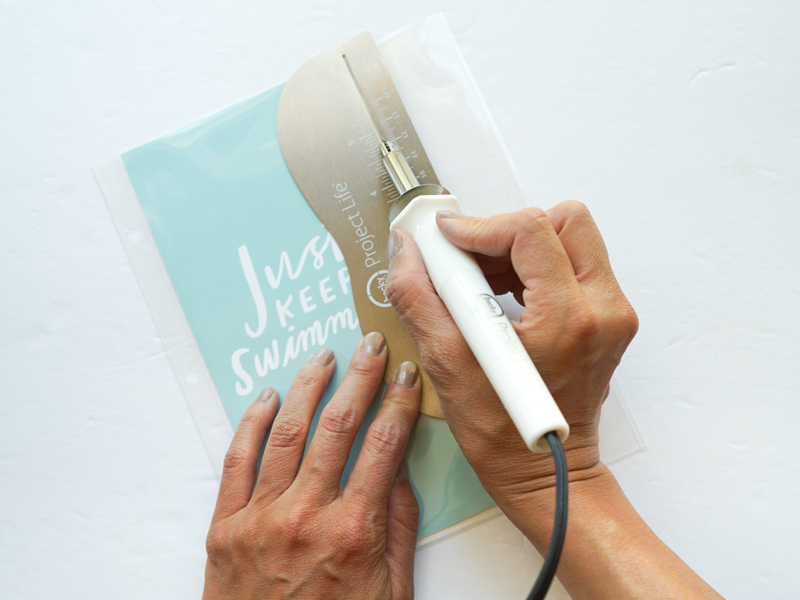
First, I measured 1.5″ from the edge of the binder with my ruler and pencil. I marked the inside of the binder, but it doesn’t really matter since it’s pencil and can be erased later if the line isn’t completely cut away.

Next, using my ruler and box cutter, I cut through the binder along the line. As you can see, I don’t have a proper cutting mat but just layered several layers of newspapers under the album. You will definitely want something underneath your cutting area to avoid damaging your work surface.
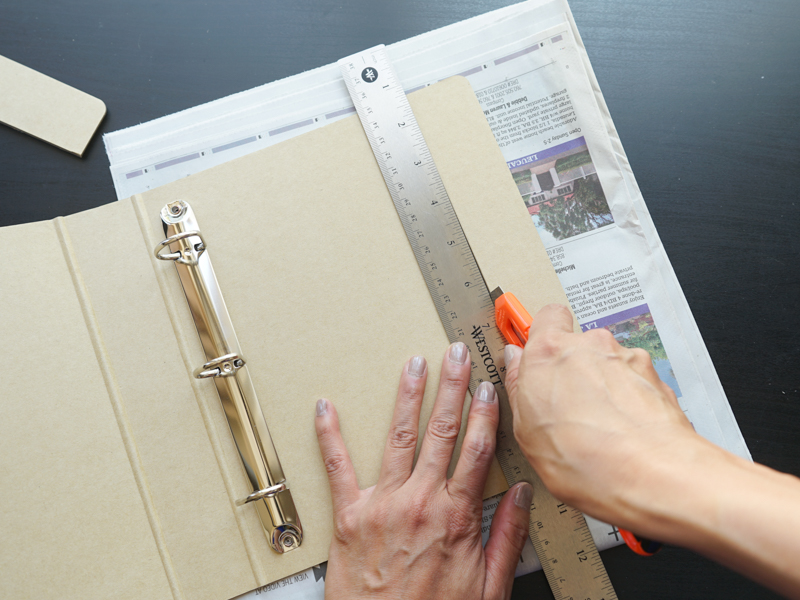

The box cutter cut pretty cleanly for me but if your cut wasn’t as clean, you could probably clean it up with some fine sandpaper.

That’s it! Now you have an album that will fit TN-sized pages nicely. You can add them directly into the album by punching holes into the papers!
But, if you don’t want to do that, you can also use page protectors…
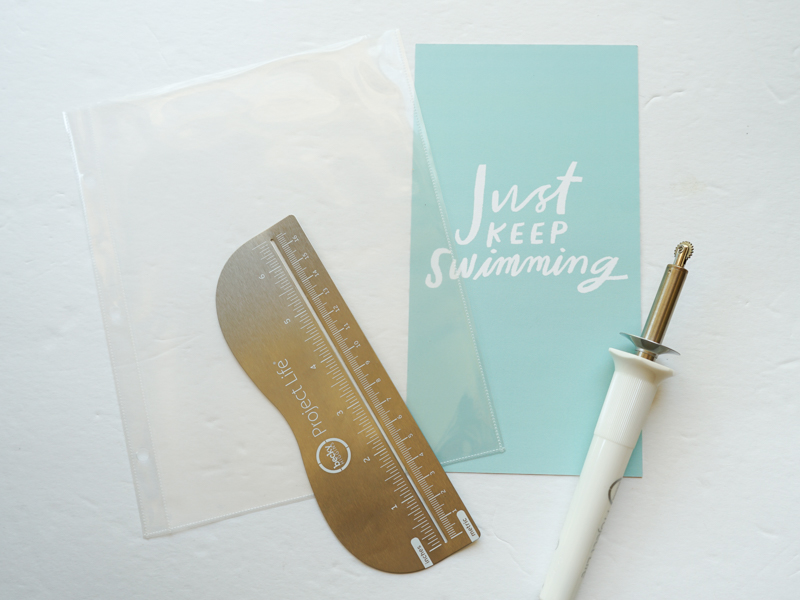
Page Protectors
If you’d like to use page protectors in the album, the album does come with 12 page protectors. There are 4 different configurations, 3 of each kind. Hobby Lobby also sells refill packs of these 6″ x 8″ page protectors. They come in a pack of 16 (4 each of the 4 different configurations) for $4.99. Unfortunately, I am only interested in the 1 full page pocket configuration and it doesn’t seem like they sell packs of just this type of configuration. But at $2.50/package (again, there was a 50% sale when I went into the store), it was still pretty cheap. I can also use the 4 pocket configuration as a two 3″ x 4″ pocket configuration in this album by just cutting off the other two pockets.

To make the page protectors fit in the album, I used my Fuse tool to fuse a line down so a TN (4.25″ x 8.25″) paper would fit.
So there you have it! I’m pretty happy with how this turned out will probably do it again. I only know of one company at this time that makes a similar sized album, but it costs a lot more! The cost for this album was about $6 ($3.50 + $2.50).
With 1 refill pack and the page protectors that came in the album, I ended up with seven full page protectors and seven 2-(3″ x 4″) pocket page protectors (but you could easily make more with the leftover 14 page protectors using the Fuse tool). And if you need more than 7 full page protectors, it’s cheap enough to buy more refill packs (what I will probably do).
Now I’ve got an album where I can add TN pages, with or without page protectors, 3″ x 4″ pocket cards, and different-sized odd cards as well:

As you can see, I’ve already started working on my album and will share more about these pages soon! 🙂
I hope this post was helpful!
3,885 responses to “DIY Traveler’s Notebook Album”
online levitra sales
https://nolvadex.life/# tamoxifen estrogen
cost generic propecia tablets [url=http://finasteride.store/#]buy propecia[/url] buying propecia without a prescription
levitra online sale
лазерный пескоструй купить цена [url=https://www.apparaty-lazernoy-ochistki.ru/]https://www.apparaty-lazernoy-ochistki.ru/[/url] .
Cheap Levitra online: Buy Vardenafil 20mg – Levitra 20 mg for sale
What’s up, its nice post regarding media print, we all know media is a great source of data.
super kamagra: kamagra.win – cheap kamagra
Do you need to earn money without much effort? if you know how to gamble it will be easy for you, if you need more information just visit this site to help you even more.
https://main7.top/obama/
http://kamagra.win/# Kamagra 100mg
I truly appreciate this post.Really thank you! Will read on…
Generally I don’t learn article on blogs, however I would like tosay that this write-up very compelled me to try and do it!Your writing style has been amazed me. Thanks, quite nice post.
buy tadalafil reddit
Thanks for sharing, this is a fantastic post. Awesome.
http://cenforce.pro/# buy cenforce
When I originally commented I clicked the «Notify me when new comments are added» checkbox and now each time a comment is added I get four emails with the same comment. Is there any way you can remove people from that service? Many thanks!
http://kamagra.win/# buy Kamagra
I wanted to thank you for this very good read!!I definitely enjoyed every little bit of it. I have youbook-marked to check out new things you post…
https://cialist.pro/# Generic Cialis without a doctor prescription
Cheers. Loads of postings. Tamoxifen Efectos Secundarios
Greetings! Very useful advice within this post! It’s the little changes that make the greatest changes. Thanks a lot for sharing!
sildenafil teva how to take sildenafil sildenafil goodrx
I needed to thank you for this fantastic read!! I certainly loved every little bit of it. I have got you book-marked to check out new things you post…
http://levitrav.store/# Levitra 10 mg best price
Viagra tablet online: Cheapest place to buy Viagra – buy Viagra online
п»їLevitra price: Levitra generic price – Levitra online pharmacy
http://levitrav.store/# Buy generic Levitra online
This is a very good tip particularly to those fresh to the blogosphere. Short but very accurate infoÖ Many thanks for sharing this one. A must read post!
Hi there colleagues, nice paragraph and pleasant arguments commented at this place,I am truly enjoying by these.
You are obviously very knowledgeable. It’s like you read my thoughts! Nice read. Thanks for writing this.
Having read this I thought it was very informative. I appreciate you finding the time and effort to put this information together. I once again find myself spending way too much time both reading and commenting. But so what, it was still worthwhile!
http://kamagra.win/# buy kamagra online usa
https://cenforce.pro/# Cenforce 100mg tablets for sale
http://cenforce.pro/# Cenforce 150 mg online
http://cialist.pro/# Buy Cialis online
nitroglycerin online – lozol 2.5mg pills buy diovan 80mg online cheap