
I’ve been working on a new mini-album and wanted to share the very economic album I’m using. I cut down a 6″ x 8″ chipboard binder to fit traveler’s notebook-sized pages! I originally got the idea from Jessica Rubio, who cut down the same binder to 3″ x 8″ for her trip to Mexico. I wanted to do the same thing, but slightly wider, to accommodate TN pages.
While I love working in the traveler’s notebook format, I don’t love the limitation on bulky items and odd-sized pages. I also don’t always scrapbook chronologically which means using a traditional notebook can sometimes be a challenge when my mini-album is ordered chronologically. I like being able to jump around and move things if I need to.
Cutting down the binder is pretty straightforward. When you’re finished, you will have an album that will fit standard size TN pages (4.25″W x 8.25″H), or pages of up to 5″W x 8.25″H (this is the width adjusted when the TN paper is in a page protector).

I am using this 6″ x 8″ chipboard binder from Hobby Lobby (but you could probably use another 6″ x 8″ binder). It has a 1.5″ spine, 3-ring configuration, and comes with some page protectors. It retails for $6.99 but the store was having a sale on this entire brand (The Paper Studio) so I got it for $3.50 + tax.
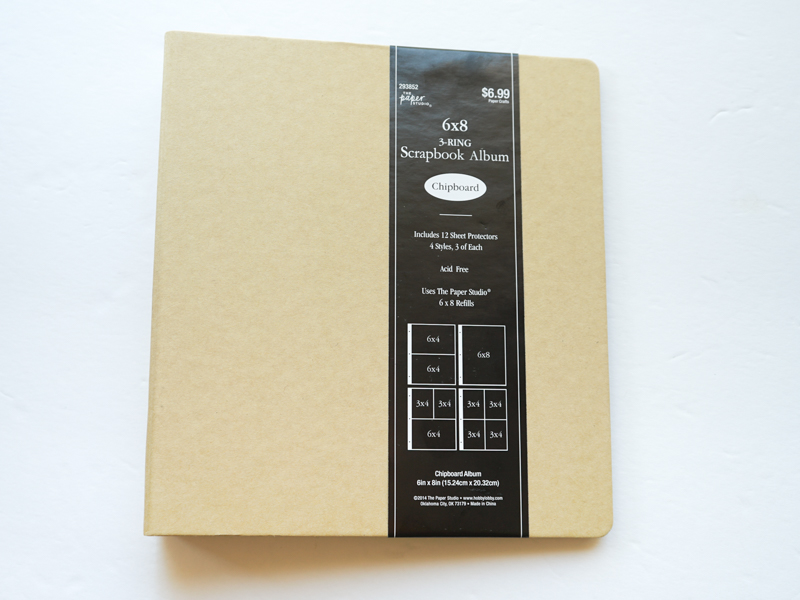
For this project, you will need:
- a binder
- a box cutter, x-acto knife, or something similar to cut with
- a ruler
- a pencil
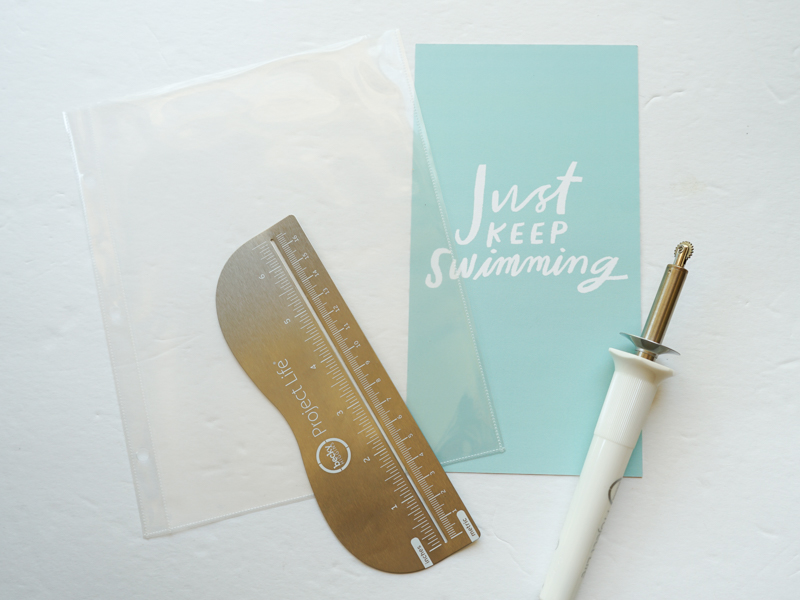
- Fuse tool, for page protectors (optional)

First, I measured 1.5″ from the edge of the binder with my ruler and pencil. I marked the inside of the binder, but it doesn’t really matter since it’s pencil and can be erased later if the line isn’t completely cut away.

Next, using my ruler and box cutter, I cut through the binder along the line. As you can see, I don’t have a proper cutting mat but just layered several layers of newspapers under the album. You will definitely want something underneath your cutting area to avoid damaging your work surface.
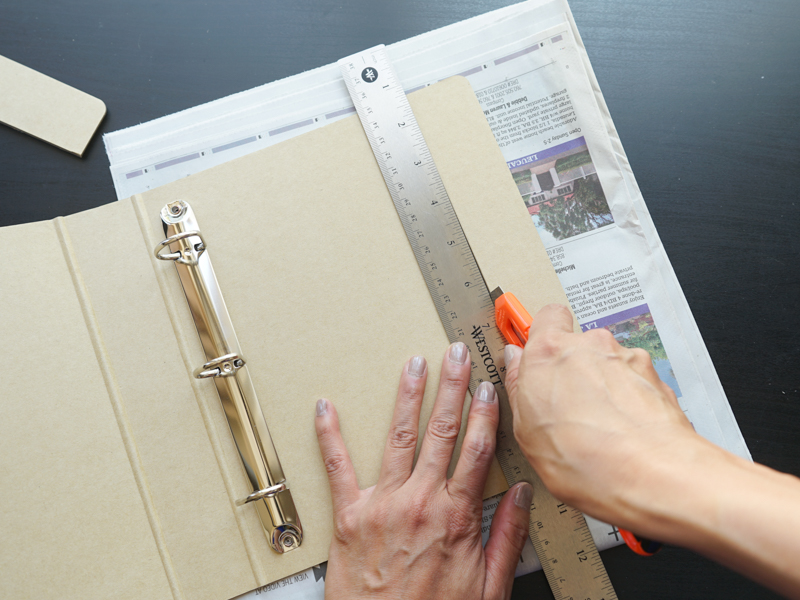

The box cutter cut pretty cleanly for me but if your cut wasn’t as clean, you could probably clean it up with some fine sandpaper.

That’s it! Now you have an album that will fit TN-sized pages nicely. You can add them directly into the album by punching holes into the papers!
But, if you don’t want to do that, you can also use page protectors…
Page Protectors
If you’d like to use page protectors in the album, the album does come with 12 page protectors. There are 4 different configurations, 3 of each kind. Hobby Lobby also sells refill packs of these 6″ x 8″ page protectors. They come in a pack of 16 (4 each of the 4 different configurations) for $4.99. Unfortunately, I am only interested in the 1 full page pocket configuration and it doesn’t seem like they sell packs of just this type of configuration. But at $2.50/package (again, there was a 50% sale when I went into the store), it was still pretty cheap. I can also use the 4 pocket configuration as a two 3″ x 4″ pocket configuration in this album by just cutting off the other two pockets.

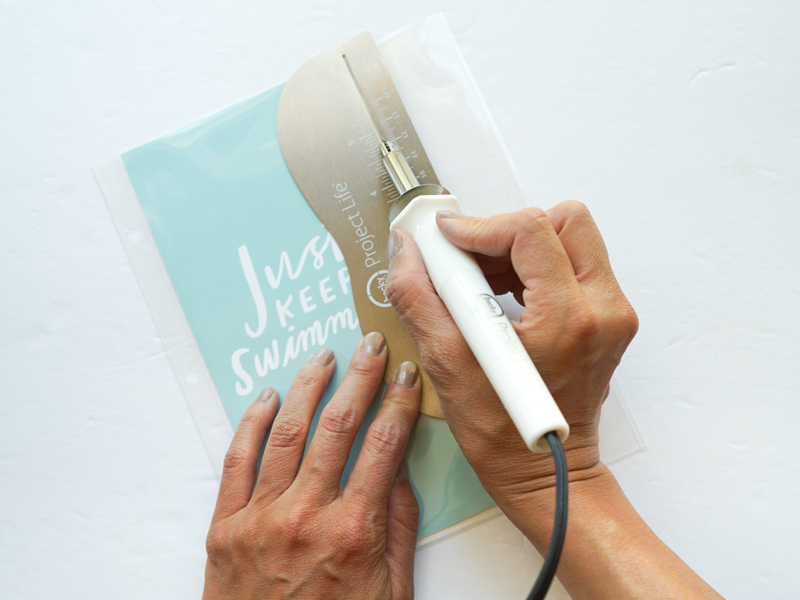
To make the page protectors fit in the album, I used my Fuse tool to fuse a line down so a TN (4.25″ x 8.25″) paper would fit.
So there you have it! I’m pretty happy with how this turned out will probably do it again. I only know of one company at this time that makes a similar sized album, but it costs a lot more! The cost for this album was about $6 ($3.50 + $2.50).
With 1 refill pack and the page protectors that came in the album, I ended up with seven full page protectors and seven 2-(3″ x 4″) pocket page protectors (but you could easily make more with the leftover 14 page protectors using the Fuse tool). And if you need more than 7 full page protectors, it’s cheap enough to buy more refill packs (what I will probably do).
Now I’ve got an album where I can add TN pages, with or without page protectors, 3″ x 4″ pocket cards, and different-sized odd cards as well:

As you can see, I’ve already started working on my album and will share more about these pages soon! 🙂
I hope this post was helpful!
20,606 responses to “DIY Traveler’s Notebook Album”
SWA Системно-семейные расстановки по Хеллингеру. https://rasstanovkiural.ru
JXI Системные семейные расстановки. Москва и Онлайн. https://rasstanovkiural.ru
Take your shot at winning big with [url=https://pachinko-5.asia/the-complete-history-of-pachinko/]Pachinko[/url], a game that’s both thrilling and rewarding.
[url=https://pachinko-5.xyz/the-appeal-and-future-of-pachinko/]Pachinko[/url] brings you a world of fast-paced action, where every ball could lead to the jackpot.
The finesse with which you articulated The points has me captivated. It’s as if you’re speaking my language.
Thanks , I’ve recently been searching for info about this subject for ages and yours is the best I’ve came upon so far. However, what concerning the bottom line? Are you positive concerning the source?
сервис по ремонту фотоаппаратов
I will immediately snatch your rss as I can’t to find your email subscription hyperlink or newsletter service.Do you’ve any? Kindly let me know in order that I maysubscribe. Thanks.
You need to take part in a contest for one of the finest blogs online. I will highly recommend this blog!
Immerse yourself in the colorful and dynamic world of [url=https://pachinko-5.vip/pachinko-history-impact-and-future/]Pachinko[/url], where the excitement never ends.
What’s up i am kavin, its my first time to commenting anyplace, when i read thisparagraph i thought i could also make comment due to this brilliant post.my blog … via [aigui.vip]
Whether you’re a pro or just starting, [url=https://pachinko-5.top/exploring-pachinko/]Pachinko[/url] offers endless fun with its simple yet addictive gameplay.
I cannot thank you enough for the blog article.Really thank you! Want more.
Hi there! I know this is kinda off topic but I was wondering if you knewwhere I could locate a captcha plugin for my commentform? I’m using the same blog platform as yours and I’m having problems finding one?Thanks a lot!
I like what you guys are up too. Such clever work and exposure! Keep up the great works guys I’ve added you guys to our blogroll.
Wow plenty of awesome material! albuterol generic
My brother suggested I would possibly like this blog.He used to be totally right. This post truly made my day.You can not believe just how a lot time I had spent for this info!Thanks!
I blog often and I really appreciate your content. This great article has really peaked my interest. I am going to bookmark your blog and keep checking for new details about once per week. I subscribed to your Feed as well.
I need to to thank you for this good read!! I certainly loved every bit of it. I’ve got you bookmarked to check out new things you postÖ
Pretty nice post. I just stumbled upon your blog and wished to say that I have truly enjoyed browsing your blog posts. After all I will be subscribing to your rss feed and I hope you write again soon!
adult Sites
elisa 26ans une blonde a la poitrine incroyable
Thank you for every other excellent article. Where else may anyone get that type of info in such an ideal means of writing? I’ve a presentation next week, and I am at the look for such information.
Ahaa, its good dialogue regarding this paragraph here atthis blog, I have read all that, so at this time me alsocommenting here.
SZQ Дизайн человека https://rasschitat-dizayn-cheloveka-onlayn.ru Дизайн человека. 4/1 Дизайн человека.
[url=https://lewandowski.com.az]https://lewandowski.com.az[/url]
Robert Lewandowski Barcelona
https://lewandowski.com.az
I am not sure where you are getting your info, but good topic. I needs to spend some time learning more or understanding more. Thanks for wonderful information I was looking for this information for my mission.
TVQ Дизайн человека https://rasschitat-dizayn-cheloveka-onlayn.ru Дизайн человека. 2/5 Дизайн человека.
Hi! This is my first visit to your blog! We are a team of volunteers and starting a new project in a communityin the same niche. Your blog provided usvaluable information to work on. You have done a wonderfuljob!
quetiapine medication seroquel dosing for agitation
adult Sites
hotwife at doctor s office . kari cachonda
Профессиональный сервисный центр по ремонту бытовой техники с выездом на дом.
Мы предлагаем:ремонт бытовой техники в екб
Наши мастера оперативно устранят неисправности вашего устройства в сервисе или с выездом на дом!
Профессиональный сервисный центр по ремонту варочных панелей и индукционных плит.
Мы предлагаем: сервисный центр варочных панелей
Наши мастера оперативно устранят неисправности вашего устройства в сервисе или с выездом на дом!
adult Sites
compraciendo com mi juguete
[url=https://pachinko-5.org/story-of-pachinko/]Pachinko[/url] combines the best of arcade fun with the thrill of winning prizes, making every game a new adventure.
The thoughtful analysis has really made me think, in a way that’s as stimulating as a deep gaze into The eyes.
adult Sites
anal hole expansion
Если вы искали где отремонтировать сломаную технику, обратите внимание – ремонт бытовой техники в челябинске
https://website87562.suomiblog.com/una-llave-simple-para-hostal-unveiled-44752551
Hola a todos!
Si estan planeando un viaje a Antofagasta y buscan un lugar comodo y bien ubicado para hospedarse, les quiero recomendar que echen un vistazo a mis ultimos blogs sobre hostales en Antofagasta centro. He estado investigando y escribiendo sobre los mejores alojamientos en el corazon de la ciudad, y quiero compartir con ustedes algunas opciones que podrian ser justo lo que estan buscando.
En uno de mis articulos, detallo las ventajas de hospedarse en un hostal en Antofagasta centro. Estos hostales ofrecen una combinacion perfecta de comodidad y proximidad a los principales puntos de interes de la ciudad, lo que hace que explorar Antofagasta sea mucho mas facil. Ademas, la mayoria de estos lugares ofrecen precios accesibles, lo que es ideal si estan viajando con un presupuesto ajustado.
Otro blog interesante que escribi es sobre residenciales en Antofagasta centro. Estos lugares suelen ser mas acogedores y personales que los grandes hoteles, y pueden ofrecer una experiencia mas autentica y cercana a la cultura local. Ademas, muchos de estos residenciales cuentan con servicios adicionales que pueden hacer su estancia aun mas agradable.
Y si estan buscando algo mas formal, tambien tengo una guia sobre hoteles en Antofagasta centro. Estos hoteles suelen ofrecer un nivel superior de comodidad y servicio, con amenities que van desde restaurantes hasta servicios de spa. Si buscan una estancia mas lujosa o si eligen un hotel por razones de negocios, este blog les dara todas las opciones para que elijan la que mejor se adapte a sus necesidades.
Espero que estos blogs les sean de gran ayuda al planear su viaje. ?No duden en comentar o hacer preguntas si necesitan mas informacion sobre estos alojamientos en Antofagasta!
?Saludos y feliz viaje!
https://google.com.kh/url?q=https://bankrotstvo-fizilic-krasnodar.ru
adult Sites
femdom butt
HPL Дизайн человека https://rasschitat-dizayn-cheloveka-onlayn.ru Дизайн человека. 1/3 Дизайн человека.
VOB Дизайн человека https://rasschitat-dizayn-cheloveka-onlayn.ru Дизайн человека. 4/6 Дизайн человека.
adult Sites
como me encanta chupar una buena polla
adult Sites
my sexy female boss . patricia acevedo
PIU Дизайн человека https://irida-design.ru Дизайн человека. 4/6 Дизайн человека.
TAU Дизайн человека https://designmsu.ru Дизайн человека. 6/3 Дизайн человека.
BKU Дизайн человека https://vkl-design.ru Дизайн человека. 6/2 Дизайн человека.
FGP Дизайн человека https://designchita.ru Дизайн человека. 3/6 Дизайн человека.
adult Sites
punheta guiada a dra. mandy vai te ajudar a bater uma punheta e tirar toda a sua dor mas tem que gozar na bucetinha dela ok
FLJ Дизайн человека https://vkl-design.ru Дизайн человека. 1/4 Дизайн человека.