
I’ve been working on a new mini-album and wanted to share the very economic album I’m using. I cut down a 6″ x 8″ chipboard binder to fit traveler’s notebook-sized pages! I originally got the idea from Jessica Rubio, who cut down the same binder to 3″ x 8″ for her trip to Mexico. I wanted to do the same thing, but slightly wider, to accommodate TN pages.
While I love working in the traveler’s notebook format, I don’t love the limitation on bulky items and odd-sized pages. I also don’t always scrapbook chronologically which means using a traditional notebook can sometimes be a challenge when my mini-album is ordered chronologically. I like being able to jump around and move things if I need to.
Cutting down the binder is pretty straightforward. When you’re finished, you will have an album that will fit standard size TN pages (4.25″W x 8.25″H), or pages of up to 5″W x 8.25″H (this is the width adjusted when the TN paper is in a page protector).

I am using this 6″ x 8″ chipboard binder from Hobby Lobby (but you could probably use another 6″ x 8″ binder). It has a 1.5″ spine, 3-ring configuration, and comes with some page protectors. It retails for $6.99 but the store was having a sale on this entire brand (The Paper Studio) so I got it for $3.50 + tax.
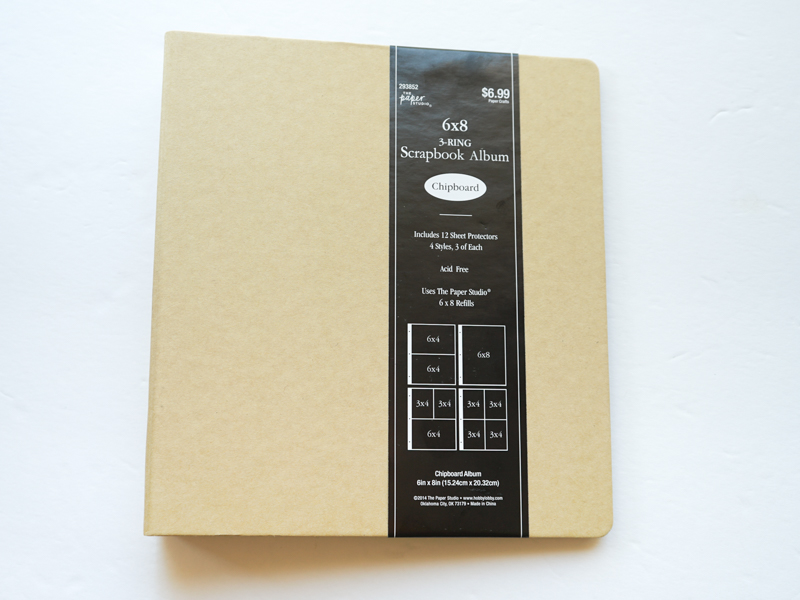
For this project, you will need:
- a binder
- a box cutter, x-acto knife, or something similar to cut with
- a ruler
- a pencil
- Fuse tool, for page protectors (optional)

First, I measured 1.5″ from the edge of the binder with my ruler and pencil. I marked the inside of the binder, but it doesn’t really matter since it’s pencil and can be erased later if the line isn’t completely cut away.

Next, using my ruler and box cutter, I cut through the binder along the line. As you can see, I don’t have a proper cutting mat but just layered several layers of newspapers under the album. You will definitely want something underneath your cutting area to avoid damaging your work surface.
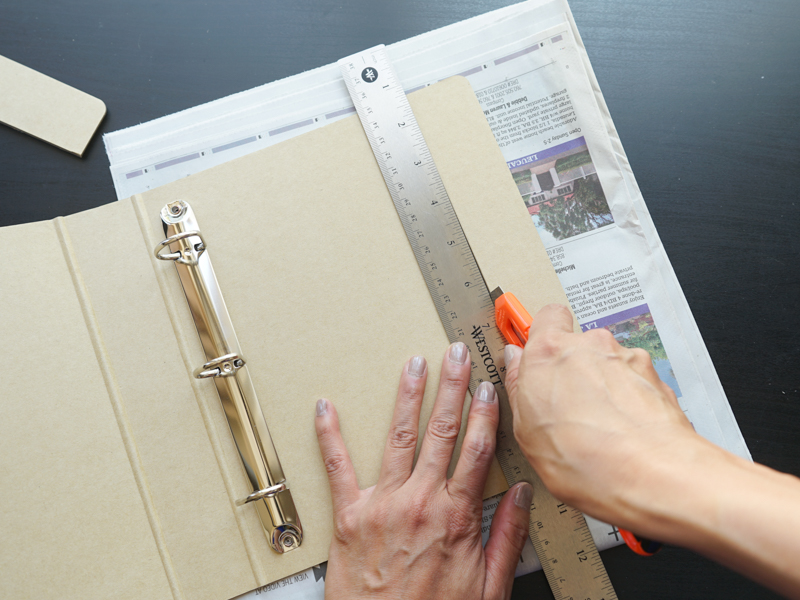

The box cutter cut pretty cleanly for me but if your cut wasn’t as clean, you could probably clean it up with some fine sandpaper.

That’s it! Now you have an album that will fit TN-sized pages nicely. You can add them directly into the album by punching holes into the papers!
But, if you don’t want to do that, you can also use page protectors…
Page Protectors
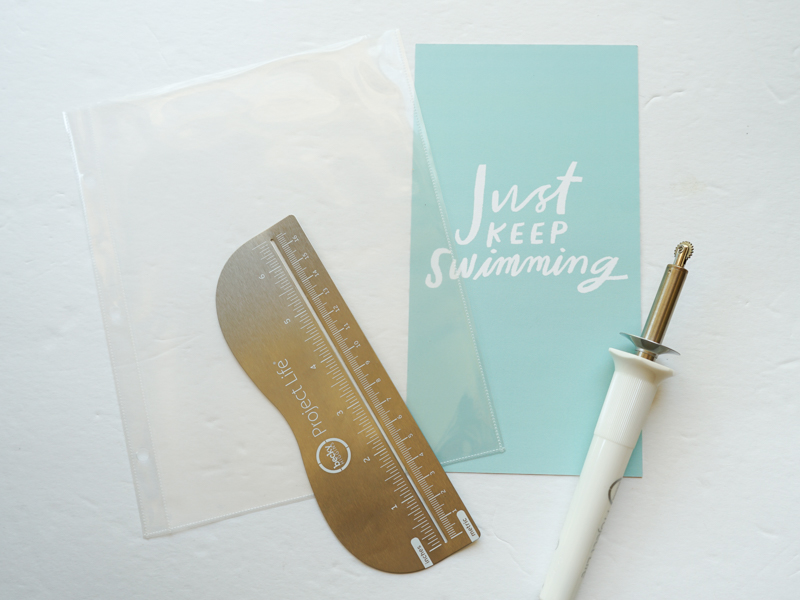
If you’d like to use page protectors in the album, the album does come with 12 page protectors. There are 4 different configurations, 3 of each kind. Hobby Lobby also sells refill packs of these 6″ x 8″ page protectors. They come in a pack of 16 (4 each of the 4 different configurations) for $4.99. Unfortunately, I am only interested in the 1 full page pocket configuration and it doesn’t seem like they sell packs of just this type of configuration. But at $2.50/package (again, there was a 50% sale when I went into the store), it was still pretty cheap. I can also use the 4 pocket configuration as a two 3″ x 4″ pocket configuration in this album by just cutting off the other two pockets.

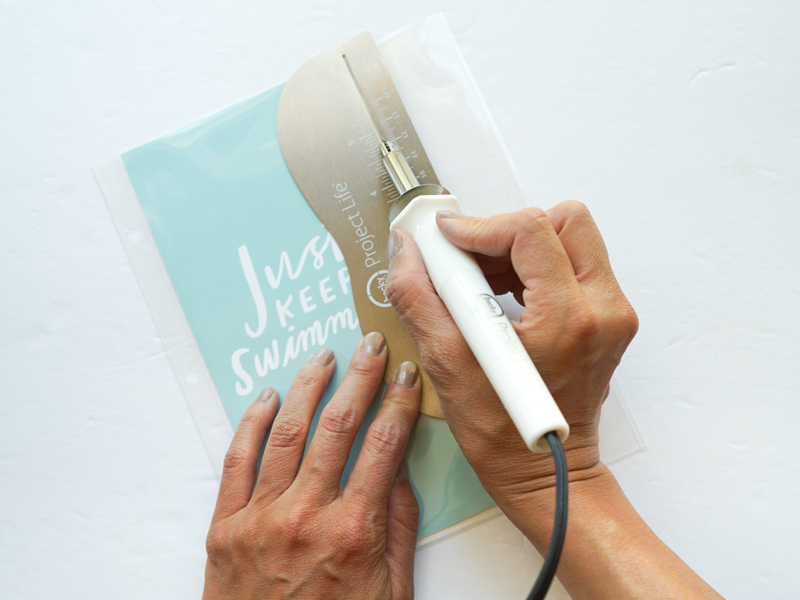
To make the page protectors fit in the album, I used my Fuse tool to fuse a line down so a TN (4.25″ x 8.25″) paper would fit.
So there you have it! I’m pretty happy with how this turned out will probably do it again. I only know of one company at this time that makes a similar sized album, but it costs a lot more! The cost for this album was about $6 ($3.50 + $2.50).
With 1 refill pack and the page protectors that came in the album, I ended up with seven full page protectors and seven 2-(3″ x 4″) pocket page protectors (but you could easily make more with the leftover 14 page protectors using the Fuse tool). And if you need more than 7 full page protectors, it’s cheap enough to buy more refill packs (what I will probably do).
Now I’ve got an album where I can add TN pages, with or without page protectors, 3″ x 4″ pocket cards, and different-sized odd cards as well:

As you can see, I’ve already started working on my album and will share more about these pages soon! 🙂
I hope this post was helpful!
20,606 responses to “DIY Traveler’s Notebook Album”
сколько стоит банкротство
https://www.yell.ru/volgograd/com/bankrotstvo-fizlic-v-volgograde_14480361/
ariestogel
I know this if off topic but I’m looking into starting my own blog and
was wondering what all is required to get set up?
I’m assuming having a blog like yours would cost a pretty penny?
I’m not very web smart so I’m not 100% certain. Any tips or advice
would be greatly appreciated. Kudos
bot глаз бога
https://glazaboga.tech
Профессиональный сервисный центр по ремонту видео техники а именно видеокамер.
Мы предлагаем: ремонт видеокамер на дому
Наши мастера оперативно устранят неисправности вашего устройства в сервисе или с выездом на дом!
nightmare darknet market how to get to darknet market
Key Developers and Companies Involved parimatch
Thanks , I have recently been looking for information about this topic for ages and yours is the best I’ve discovered so far. But, what about the bottom line? Are you sure about the source?
глаз бога найти по фото
https://glazaboga.tech
Sertai [url=https://mega888-1.com/]Mega888[/url] hari ini dan menangi ganjaran hebat melalui permainan slot dan kasino yang mendebarkan.
To start playing the Aviator Game, simply choose a reputable online casino platform that offers the game. melbet
глаз бога телеграм канал
https://glazaboga.tech
как сделать себя банкротом
https://openmig.ru/brands/bankrotstvo-fizlits-v-volgograde
Muat turun [url=https://mega888-1.in/]Mega888[/url] dan alami keseronokan permainan kasino dalam talian yang berkualiti tinggi, bila-bila masa dan di mana sahaja.
[url=https://mega888-1.vip/]Mega888[/url] ialah platform kasino yang popular dengan reka bentuk mesra pengguna dan permainan yang penuh aksi.
глаз бога по номеру
https://glazaboga.tech
Features and Benefits ozwin
Rasai pengalaman permainan kasino yang lancar dan selamat dengan [url=https://mega888-1.top/]Mega888[/url], platform pilihan ramai.
Фрибеты Фонбет промокод https://milmed.spb.ru/wp-content/pgs/aktualnuy_promokod_fonbet_pri_registracii.html
Промокоды на фрибеты от Фонбет предоставляют пользователям возможность сделать бесплатные ставки. Например, промокод ‘GIFT200’ активирует фрибеты для новых пользователей, что позволяет сделать ставки без риска потери собственных средств. Эти промокоды делают игру более привлекательной и увеличивают шансы на выигрыш.
глаз бога телеграмм официальный
https://glazaboga.tech
Jangan lepaskan peluang untuk bermain dan menang di [url=https://mega888-1.org/]Mega888[/url], platform kasino dalam talian yang dipercayai di Malaysia.
Если вы искали где отремонтировать сломаную технику, обратите внимание – сервисный центр в красноярске
глаз бога бот ссылка
https://glazaboga.tech
Muat turun aplikasi [url=https://mega888-2.com/]Mega888[/url] untuk akses mudah kepada permainan slot yang penuh dengan ganjaran lumayan.
глаз бога бот бесплатно
https://glazaboga.tech
тг канал глаз бога
https://glazaboga.tech
The analysis made me think about the topic in a new way. Thanks for the insightful read.
глаз бога бесплатно на телефон
https://glazaboga.tech
flagyl metronidazole metronidazole and alcohol metronidazole gel
I am not sure where you are getting your information, but good topic. I needs to spend some time learning more or understanding more. Thanks for magnificent info I was looking for this information for my mission.
Very good article.Thanks Again. Will read on
Профессиональный сервисный центр по ремонту бытовой техники с выездом на дом.
Мы предлагаем: сервисные центры в москве
Наши мастера оперативно устранят неисправности вашего устройства в сервисе или с выездом на дом!
additional hints says:Say, you got a nice article post.Thanks Again. Really Cool.Reply 10/23/2021 at 6:37 pm
Профессиональный сервисный центр по ремонту видео техники а именно видеокамер.
Мы предлагаем: ремонт видеокамер
Наши мастера оперативно устранят неисправности вашего устройства в сервисе или с выездом на дом!
You mentioned it adequately!writing experience essay dissertation writing services seo writing service
Thanks. Useful information.why do we write essays essay paper help professional writing company
глаз бога программа для поиска
https://glazaboga.tech
Если вы искали где отремонтировать сломаную технику, обратите внимание – профи нижний новгород
Bermain di [url=https://mega888-2.xyz/]Mega888[/url] memberi anda peluang untuk memenangi jackpot besar dan menikmati promosi eksklusif.
частный риэлтор в москве
Обращение к риэлтору при покупке или продаже недвижимости может быть полезным по нескольким причинам:
1. **Профессиональные знания и опыт**: Риэлторы обладают глубокими знаниями рынка недвижимости и опытом, который позволяет им эффективно вести переговоры и избегать распространенных ошибок.
Dengan antara muka yang mudah digunakan, [url=https://mega888-2.in/]mega888[/url] menjadikan pengalaman permainan kasino dalam talian lebih menyeronokkan.
глаз бога телеграмм сайт
https://glazaboga.tech
Experience the excitement of [url=https://pachinko-5.com/]Pachinko[/url], where every ball brings you closer to thrilling rewards.
neymar jr shop [url=http://wwww.neymar-az.com]wwww.neymar-az.com[/url] neymar jr plays for which team http://www.neymar-az.com/ .
kaka milan 2006 [url=https://www.kaka.com.az/]a kaka[/url] milan soccer rikardo kaka .
telegram глаз бога
https://glazaboga.tech
хороший риэлтор
5. **Юридическая безопасность**: Риэлторы хорошо знакомы с юридическими аспектами сделок с недвижимостью, что помогает избежать юридических проблем и спорных ситуаций.
глаз бога поиск людей
https://glazaboga.tech
Если вы искали где отремонтировать сломаную технику, обратите внимание – ремонт бытовой техники в красноярске
oral baclofen 25mg – baclofen over the counter buy feldene 20mg for sale
With vibrant graphics and fast-paced action, [url=https://pachinko-5.asia/]Pachinko[/url] is the perfect game for anyone looking for non-stop entertainment.