
I’ve been working on a new mini-album and wanted to share the very economic album I’m using. I cut down a 6″ x 8″ chipboard binder to fit traveler’s notebook-sized pages! I originally got the idea from Jessica Rubio, who cut down the same binder to 3″ x 8″ for her trip to Mexico. I wanted to do the same thing, but slightly wider, to accommodate TN pages.
While I love working in the traveler’s notebook format, I don’t love the limitation on bulky items and odd-sized pages. I also don’t always scrapbook chronologically which means using a traditional notebook can sometimes be a challenge when my mini-album is ordered chronologically. I like being able to jump around and move things if I need to.
Cutting down the binder is pretty straightforward. When you’re finished, you will have an album that will fit standard size TN pages (4.25″W x 8.25″H), or pages of up to 5″W x 8.25″H (this is the width adjusted when the TN paper is in a page protector).

I am using this 6″ x 8″ chipboard binder from Hobby Lobby (but you could probably use another 6″ x 8″ binder). It has a 1.5″ spine, 3-ring configuration, and comes with some page protectors. It retails for $6.99 but the store was having a sale on this entire brand (The Paper Studio) so I got it for $3.50 + tax.
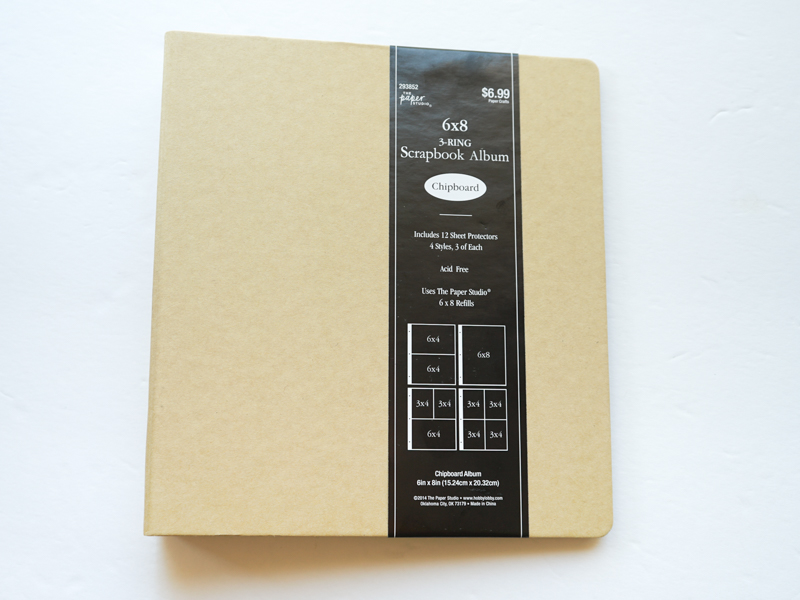
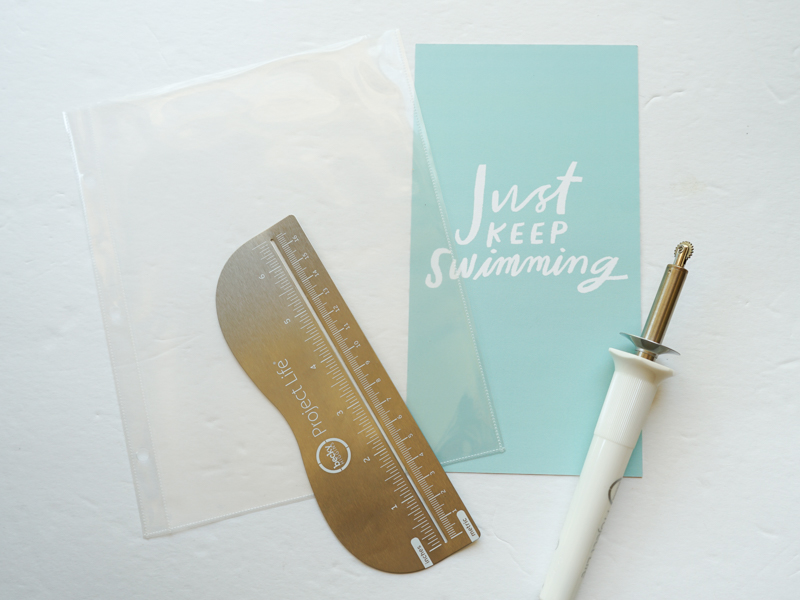
For this project, you will need:
- a binder
- a box cutter, x-acto knife, or something similar to cut with
- a ruler
- a pencil
- Fuse tool, for page protectors (optional)

First, I measured 1.5″ from the edge of the binder with my ruler and pencil. I marked the inside of the binder, but it doesn’t really matter since it’s pencil and can be erased later if the line isn’t completely cut away.

Next, using my ruler and box cutter, I cut through the binder along the line. As you can see, I don’t have a proper cutting mat but just layered several layers of newspapers under the album. You will definitely want something underneath your cutting area to avoid damaging your work surface.
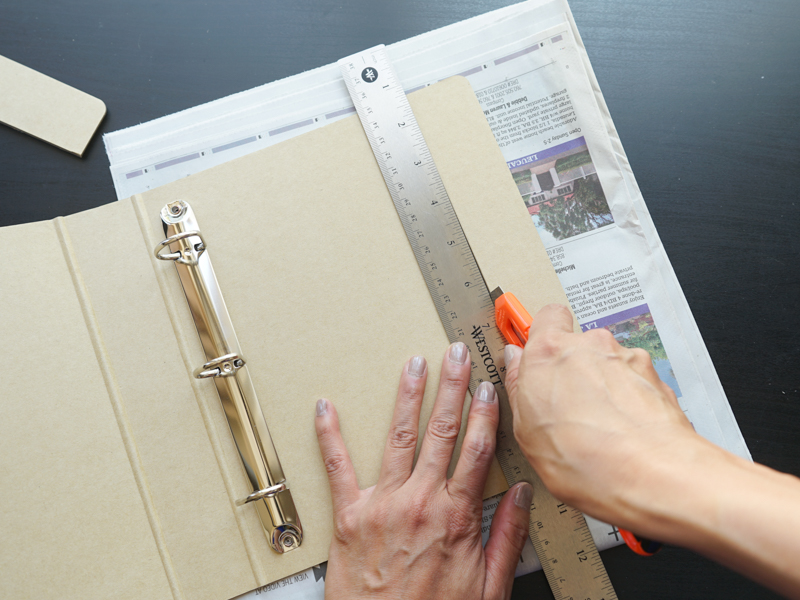

The box cutter cut pretty cleanly for me but if your cut wasn’t as clean, you could probably clean it up with some fine sandpaper.

That’s it! Now you have an album that will fit TN-sized pages nicely. You can add them directly into the album by punching holes into the papers!
But, if you don’t want to do that, you can also use page protectors…
Page Protectors
If you’d like to use page protectors in the album, the album does come with 12 page protectors. There are 4 different configurations, 3 of each kind. Hobby Lobby also sells refill packs of these 6″ x 8″ page protectors. They come in a pack of 16 (4 each of the 4 different configurations) for $4.99. Unfortunately, I am only interested in the 1 full page pocket configuration and it doesn’t seem like they sell packs of just this type of configuration. But at $2.50/package (again, there was a 50% sale when I went into the store), it was still pretty cheap. I can also use the 4 pocket configuration as a two 3″ x 4″ pocket configuration in this album by just cutting off the other two pockets.

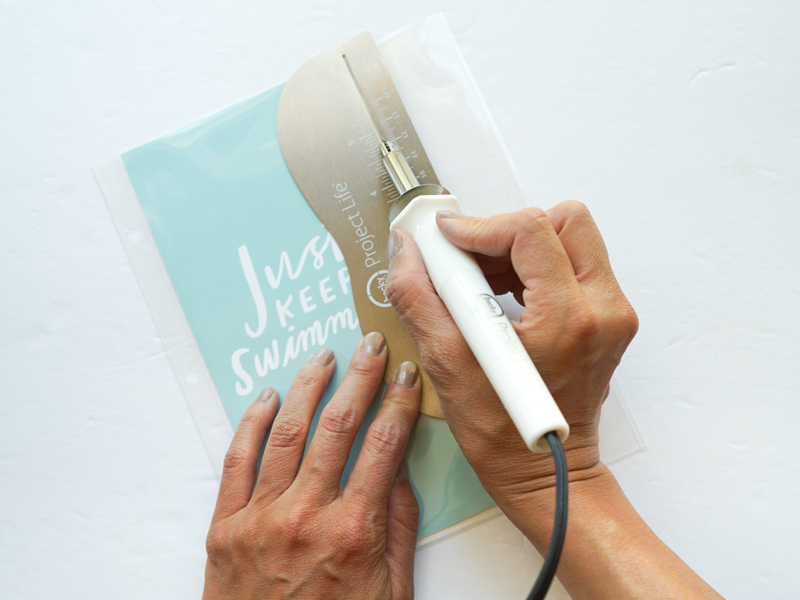
To make the page protectors fit in the album, I used my Fuse tool to fuse a line down so a TN (4.25″ x 8.25″) paper would fit.
So there you have it! I’m pretty happy with how this turned out will probably do it again. I only know of one company at this time that makes a similar sized album, but it costs a lot more! The cost for this album was about $6 ($3.50 + $2.50).
With 1 refill pack and the page protectors that came in the album, I ended up with seven full page protectors and seven 2-(3″ x 4″) pocket page protectors (but you could easily make more with the leftover 14 page protectors using the Fuse tool). And if you need more than 7 full page protectors, it’s cheap enough to buy more refill packs (what I will probably do).
Now I’ve got an album where I can add TN pages, with or without page protectors, 3″ x 4″ pocket cards, and different-sized odd cards as well:

As you can see, I’ve already started working on my album and will share more about these pages soon! 🙂
I hope this post was helpful!
20,606 responses to “DIY Traveler’s Notebook Album”
Pioneers in the realm of global pharmacy.
where to buy cheap cytotec without prescription
Their international health workshops are invaluable.
darknet markets onion address [url=https://github.com/aresmarketlink0ru72/aresmarketlink ]dark web link [/url]
dark market onion [url=https://github.com/darknetmarketlinks2025/darknetmarkets ]darknet marketplace [/url]
darknet markets url [url=https://github.com/aresmarketlink0ru72/aresmarketlink ]darknet markets 2025 [/url]
They provide international health solutions at my doorstep.
https://clomidpharm24.top/
Helpful, friendly, and always patient.
dark market [url=https://github.com/darknetmarketlistv8tg0/darknetmarketlist ]best darknet markets [/url]
dark web market list [url=https://github.com/nexusdarkneturlwrf4t/nexusdarkneturl ]dark web sites [/url]
dark web marketplaces [url=https://github.com/darknetmarketlistv8tg0/darknetmarketlist ]darkmarket url [/url]
Hey everyone! Have you tried, https://night-owl-optics.com/ ? Their night vision devices make low-light adventures way clearer. Whether for outdoor trips or security, they offer sharp visuals and solid performance. It’s amazing how much detail you can see in the dark. Is anyone using them for night hikes or stargazing?
dark markets [url=https://github.com/nexusdarkneturlwrf4t/nexusdarkneturl ]dark market onion [/url]
The Trump playing cards, also known as the foremost Arcana, hold a particular significance in Tarot readings attributable to their representation of main life lessons and spiritual improvement.
dark web sites [url=https://github.com/aresmarketlink0ru72/aresmarketlink ]darkmarket [/url]
darknet markets [url=https://github.com/tormarkets2025ukaz1/tormarkets2025 ]dark market url [/url]
dark markets [url=https://github.com/darknetmarketlinks2025/darknetmarkets ]darknet market lists [/url]
nudlive
[url=https://pin-up-4.com.ua/]Пин Ап[/url]
dark web markets [url=https://github.com/nexusdarkneturlwrf4t/nexusdarkneturl ]darknet markets url [/url]
darknet markets links [url=https://github.com/darknetmarketlistv8tg0/darknetmarketlist ]darkmarket [/url]
They consistently go above and beyond for their customers.
can i buy clomid price
Hassle-free prescription transfers every time.
dark web link [url=https://github.com/nexusdarkneturlwrf4t/nexusdarkneturl ]darknet markets url [/url]
gay hispanic twinks
bitcoin dark web [url=https://github.com/aresmarketlink0ru72/aresmarketlink ]darknet markets url [/url]
Plus, they won’t be splashing water all over the place or attempting to drink from it either!
darknet websites [url=https://github.com/aresmarketlink0ru72/aresmarketlink ]darknet drug store [/url]
darknet markets links [url=https://github.com/tormarkets2025ukaz1/tormarkets2025 ]darknet websites [/url]
They handle all the insurance paperwork seamlessly.
[url=https://lisinoprilpharm24.top/#]lisinopril by lupin recall[/url]|[url=https://clomidpharm24.top/#]can you get cheap clomid prices[/url]|[url=https://cytotecpharm24.top/#]cytotec 200 mcg order online[/url]|[url=https://gabapentinpharm24.top/#]does gabapentin treat peripheral neuropathy[/url]|[url=https://cipropharm24.top/#]get generic cipro pill[/url]
Best and news about drug.
darknet markets url [url=https://github.com/tormarkets2025ukaz1/tormarkets2025 ]dark web marketplaces [/url]
sexchat live
dark web drug marketplace [url=https://github.com/darknetmarketlinks2025/darknetmarkets ]dark websites [/url]
darknet market links [url=https://github.com/darknetmarketlistv8tg0/darknetmarketlist ]dark web marketplaces [/url]
Hello everyone! If you’re looking to add style and functionality to your kitchen, the https://thealaza.com/ kitchen mat is a must-have. With vibrant designs and cushioned support, it makes cooking more comfortable while elevating your decor. Explore Alaza’s collection and find the perfect mat to brighten your culinary space!
darknet drug market [url=https://github.com/nexusdarkneturlwrf4t/nexusdarkneturl ]darknet markets [/url]
dark market [url=https://github.com/aresmarketlink0ru72/aresmarketlink ]dark market list [/url]
Their digital prescription service is innovative and efficient.
buy generic cipro for sale
A game-changer for those needing international medication access.
dark web sites [url=https://github.com/darknetmarketlistv8tg0/darknetmarketlist ]darkmarket list [/url]
dark websites [url=https://github.com/aresmarketlink0ru72/aresmarketlink ]darknet market [/url]
darknet market lists [url=https://github.com/nexusdarkneturlwrf4t/nexusdarkneturl ]dark web market urls [/url]
gay nude cams
[url=https://pin-up-5.com.ua/]Пін Ап[/url]
darkmarket 2025 [url=https://github.com/tormarkets2025ukaz1/tormarkets2025 ]darknet markets 2025 [/url]
dark market [url=https://github.com/darknetmarketlinks2025/darknetmarkets ]darknet markets onion address [/url]
darknet links [url=https://github.com/tormarkets2025ukaz1/tormarkets2025 ]darkmarket [/url]
ebony live cam
dark web market urls [url=https://github.com/darknetmarketlinks2025/darknetmarkets ]darknet drug market [/url]
dark web sites [url=https://github.com/aresmarketlink0ru72/aresmarketlink ]dark web market [/url]
dark market onion [url=https://github.com/darknetmarketlistv8tg0/darknetmarketlist ]dark web link [/url]
dark web link [url=https://github.com/aresmarketlink0ru72/aresmarketlink ]darknet links [/url]
darkmarket link [url=https://github.com/nexusdarkneturlwrf4t/nexusdarkneturl ]darknet drug market [/url]
gaypnp
darkmarket link [url=https://github.com/nexusdarkneturlwrf4t/nexusdarkneturl ]dark market 2025 [/url]